Monday, December 24, 2012

Steak Marinade {Dinner Date}

Date nights are so important! My husband and I would be nuts if we didn't get some relaxing time alone. After all, we are in this big adventure we call life TOGETHER! To be a date, it doesn't mean you have to go out somewhere special. Just spend time alone together, thinking of nothing but one another. :) Date night dinners at home are that perfect balance. We don't have to get a sitter, but we can still have our date. Our last dinner date in I marinated steaks during the day and my husband grilled them up after the kids went to bed. Here's the marinade recipe. Enjoy.


Ingredients - 

  • 1/3 cup soy sauce
  • 1/2 cup olive oil
  • 1/3 cup fresh lemon juice
  • 1/4 cup Worcestershire sauce 
  • 1 1/2 tablespoons garlic powder
  • 1 1/2 tablespoons parsley flakes
  • 1 teaspoon ground white pepper
  • 1 teaspoon dried minced garlic
  • a few sprinkles of red pepper flakes

Direction - 

In a blender combine all above ingredients. Blend for about 30 seconds. Pour mixture into a gallon sized ziplock bag. Add two steaks and let marinate for 8 hours, flipping at the 4 hour mark. 

*Makes enough for two steaks

Thursday, December 20, 2012

The Basics {Baby food}

One of my very favorite things to do in my kitchen is make baby food. You can be so creative and extremely productive at the same time. Homemade baby food was the right choice for us for many different reasons. It's much healthier than jarred baby food, not to mention it TASTES better. People seem to forget that baby food should taste good too. Have you ever actually tasted jarred food? BLAH! It's awful. One reason people don't choose homemade is because they are worried it will be hard to make, but it's easy peasy! (& fun!!)


Things I use for making homemade baby-food 

  • A ninja blender. I don't use any special baby food blender just a normal blender that I use for everything else. I really love this specific one because it comes with multiple containers and it's really easy to wash. You can buy one here.
  • Storage containers for the fridge. I love these little guys because they hold the perfect amount, are great for the diaper bag and stack. *I write on them with dry erase to tell them apart* You can buy some here
  • Storage containers for the freezer. After pureeing, I transfer the baby food to a freezing container and eventually dump the cubes into ziplock bags. When I first started I used regular ice cube trays *Each cube is 1 oz* I was wrapping the trays with press and seal, but I discovered that they make ice cube trays with lids! I'm buying some! I also use these awesome little silicone trays.
  • Like I mentioned earlier, ziplock bags
  • Steamer bags

The basics

Baby food purees are all basically made the same way. You bake/steam your food, then puree it. *Meats puree best cold* Then either refridgerate for up to 3 days. OR Freeze it for up to 3 months. 

Freezing - To freeze purees pour into freezing tray (ice cube tray), cover and freeze for 24 hours. Then remove baby food cubes and place in Ziplock bags.

Pureeing - Add food to blender, pulse several times.

Steaming - Really depends on what you're making, but basically you place in a steamer bag with water and microwave until soft. You can also use a pot and a little bit of water, boil until soft.

Baking - Also depends on what you're making, but most things (Butternut squash, acorn squash, sweet potatoes) bake for about an hour at around 400. Before placing in the oven poke several holes in vegetable with a fork to help cool. If you're making a squash be sure to cut in half and remove the "guts".

That pretty much covers it! If you have any questions, feel free to email me lindsay.havens@yahoo.com or comment on this post. :)

Snowman Poop! {Nap Time Crafts}

Currently we have SEVEN stocking hanging from our fireplace and we are a family of four...Nana and Papa like to send stockings each year and they just keep adding up! I'm always torn on what to use as stocking stuffers. This year Olivia has teething toys, a rubber ducky, diaper rash cream ;) hairbows and some other stuff. Connor's stocking is stuffed with a few bits of candy, matchbox cars, bath toys and now {Snowman poop}!

As it turns out, snowman actually poop marshmallows :) I took a sandwich baggie, filled with marshmallows and glued this print out on it. The poem reads..
"I heard that you've been naughty, so listen here's the scoop....I'm running short on coal this year, so you get snowman poop!"
I have a feeling my two-year old is going to LOVE this! Not that my children have any idea what snow is. It's a lovely 72 degrees here today and we're relaxing with the windows open.  
You can find the snowman poop printables here. 

Monday, December 10, 2012

Baked Sharpie Coffee Mug DYI Project

Merry Christmas!! Yepp, it's that time of year again. :) I've already bought my husband all of his presents but I really wanted to MAKE him something special. Not cheesy, special. ;) After some searching on Pinterest, this is what I've come up with! Not only is this gift homemade and personalized, it's also FAST and CHEAP! Bonus! :)

What will you need?

  • A coffee mug from the dollar store
  • A sharpie marker
  • An oven
Preheat the oven to 350 degrees. While oven is heating up, take your sharpie and write on the coffee mug. I used two different colors. Then place the coffee mug on a baking sheet and bake for 30 minutes. Let cool. That's it! An awesome homemade gift in 35 minutes, 30 of which you are watching Grey's Anatomy. ;)


You could do this with lots of things, a coffee mug for your husband, mother-in-law, a cereal bowl for your son (good morning sunshine!), a dog bowl for your best bud (WOOF it down!). A coffee mug and plate for cookies and milk for Santa!! The possibilities are endless!

**It'll stay forever!!**

Tuesday, October 30, 2012

Nap Time Crafts!

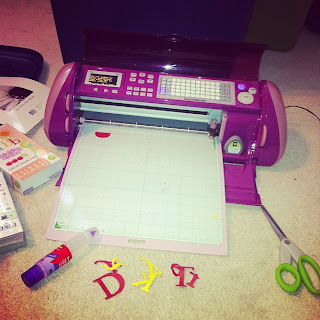
Hello! I know it's been forever since I've blogged. But with Connor finally home and Kiersten visiting, things have been crazy busy. However, today at nap time I got a bit creative. With Halloween almost over, I'm getting SUPER excited for Turkey Day! So I decided to make a countdown. :) After some coaxing of my Cricut, a little glue, and time hiding in my bedroom, this is what I came up with.....

(Sorry for the flash) 

By using a picture frame I can use dry erase marker and countdown each day! 

My partner in crime! ;)

Happy almost Turkey Day!


Sunday, September 16, 2012

Banoffee Pie

I recently discovered this incredible thing called, banoffee pie. Nothing I can say will make you understand how delicious this is, just taste it!

Ingredients:

  • 1 graham cracker pie crust
  • 3 bananas 
  • 1 can of dulce de leche 
  • 1 tub of whipped topping
  • 1 cube of bakers chocolate 

 Directions:


Slice up the bananas and layer them in the pie crust.
Pour a can of dulce de leche over the bananas.


Cover with the whipped topping. Grate chocolate over the top of the pie and refrigerate for a few hours. Enjoy!! 


Dulce de leche

What is Dulce de leche you say? Dulce de leche translates to "candy of milk", and it's a secret we Americans have apparently been left out of. It's a spreadable toffee that is EXTREMELY easy to make, all you need is a can of sweetened condensed milk. You can use this for Banoffee pie, spread it over pancakes, or drizzle over some muffins. It's good pretty much anyway you use it. :)

What'cha need?

  • Can of sweetened condensed milk
  • Pot of boiling water

Directions:

Take the wrapper of the can of sweetened condensed milk and place in the pot of boiling water and boil for about 2 1/2 hours. ***KEEP CAN COVERED WITH WATER AT ALL TIME!!*** If you do not keep the can covered with water it could over-heat and explode. Continue to refill the pot often throughout cooking. After the 2 1/2 hours, take can out of water and let cool completely.  

Thursday, September 13, 2012

Green Bean Casserole

This makes an awesome side dish or even a meal :) 


Ingredients: 

  • 2 cans of green beans {drained}
  • 1/2 can of cream of chicken
  • Milk
  • 1/2 cup of sour cream
  • french fried onions 
  • Shredded cheddar cheese


Directions:

Preheat the over to 375 degrees. In a large bowl, mix together green beans, cream of chicken, a splash of milk, sour cream, 1/2 cup of french fried onions, and 1/2 cup of cheddar. Pour mixture into a baking dish. Pop in the oven for 35 minutes. Using about a 1/2 cup of french fried onions, make a circle ontop of the dish and fill it in with about a 1/2 cup of cheddar. Bake for 10 more minutes. You're done! :) This was delicious and definitely becoming a usual in our house!


We recently had family come in town and we spent the day at the campground with them. It was a blast and I think we're going to take Connor when he gets home. :) He would have soo much fun. There were peddle boats, little cabins, hammocks, firepits and BBQ's. Can you say smores!? 

Speaking of Connor, I got a phone call the other day from my mother in law.

"Lindsay? Hi honey, don't freak out but I just wanted to tell you...." 
This can't be good..
"Connor fell in the toy room and gashed his hand open"
What on earth is in the "toy room" that could gash his hand open!? Then again he's 2.
ME: "Is he okay?? Does he needs stitches?!"
"No no I think he's okay, just didn't want you to worry"
Mission failed. Oh the moments of mommy-hood. It's confirmed, I will have gray hair before I'm 25. 

Wednesday, September 12, 2012

Tater - Tot Casserole

Oh my goodness...That's all I have to say about this amazing dish. :) Trust me, you'll love it! {Bonus? Super easy!}

Ingredients:

  • 2lbs of tater-tots {1/2 thawed}
  • Milk
  • 1 can of cream of chicken
  • 1 cup of sour cream
  • 4-5 strips of bacon {Fried && crumbled}
  • 1 cup of shredded cheddar
  • 1/2 an onion

Directions:

In a large bowl, mix together tater-tots, a splash of milk, cream of chicken, sour cream, bacon crumbles, shredded cheddar and onion. Toss in a casserole pan and bake for 45 minute at 350 degrees. Top with more cheddar and bake for 15 more minutes. You're done!


Friday, September 7, 2012

Like it!

Tiny Painted Fingers has come to Facebook! Like our page for crafty ideas, recipes, cooking tips and more!

http://www.facebook.com/tinypaintedfingers

Wednesday, September 5, 2012

Labor Day Weekend

I hope everyone had a nice Labor Day! We spent the day downtown, just taking in the sites && relaxing at home. :)


Charleston is such a beautiful city. 


 She was pretty comfy. :) This was her first trip downtown.


Tuesday, September 4, 2012

Fried Zucchini

Have you ever had fried zucchini? It's delicious! I made it for the first time today and HAD to share the recipe. My husband is insisting this become a game day favorite. :) We eat it as an appetizer, however I'm sure it'd make an awesome side..or just a snack.

Ingredients: 

  • Zucchini - However much you want
  • 2 eggs
  • Salt
  • Olive oil
  • Bread crumbs - I use panko Italian style
  • Shredded Parmesan cheese Or grated

Directions: 

Pour about two inches of olive oil into a deep frying pan. You can use a mixture of olive oil and vegetable oil if you'd like. Heat the pan to a medium - low. If you were to test the oil with a thermometer, it should read about 350 degrees. While the oil is heating, rinse and slice your zucchini. You'll want it to end up in small rectangles. About the size of the one pictured above. Crack two eggs into a small bowl and whisk them. In another small bowl, mix together about 1/2 and 1/2 bread crumbs and Parmesan cheese. I use Panko bread crumbs because they're a bit coarser than regular bread crumbs and make the zucchini crunchier, but regular will work fine. Once your oil is hot, dip the zucchini in the egg and then coat with the bread crumb mixture. Place a few pieces into the pan and cook for about two minutes. Depending on your pan size, you'll probably have to do this in batches. The zucchini should float to the top and have lots of little bubbles. Be sure not to overcook them or they'll end up soft and soggy inside. Try not to touch it to much while it's cooking or you'll knock off all the breading. Once they're cooked, take them out and lay on a paper towel lined baking sheet to cool. While still hot, sprinkle some extra cheese and salt over top. Let cool and enjoy. 

That's it, you're all done. Perfect game day snack or date night appetizer. :) Plus, these are really fun to cook! 

**Update** If you roll your zucchini in flour before coating in egg and crumb/cheese, the mixture will stick and coat MUCH better**

Project Nursery FINISHED!

I just realized I never posted pictures of our finished nursery. It turned out awesome. :)

 Her crib bedding was custom made, so it's one of a kind :)


We finally got our rocking chair in and set up. I love it!! :)
The tree is pretty much my favorite part!


We also just finished Connor's room. :)


I can't wait until he gets home and sees it! I really hope he likes it. :)


Saturday, September 1, 2012

Learning To Crochet..

Ever since I found out I was having a girl, I've been in love with all the adorable crocheted hats. I finally convinced my Bestie to come over and teach me how to make one!! It's definitely a working progress..but I'm so excited!

My baby girl turned one month old on Monday. One month!! Already!  Time is flying by, and as this is our last baby, it makes me pretty sad. Is it to early to have baby fever? ;)


Pork Chops && Cheesy Scalloped Potatoes

I was chatting on my mommy group online today when someone posted that she was making pork chops in a crockpot for dinner tonight. Pork chops...in a crockpot!? I've never even thought about trying that before. So I snagged the recipe from her, tweaked it a little bit and it turned out ah-mazing! Alright, here's my husband's new favorite recipe.


Ingredients: 

  • Pork Chops I recommend boneless chops, I used four
  • Red potatoes
  • An onion
  • Shredded cheddar cheese
  • Butter

Directions: 

Turn your crockpot on high and add a spoonful of butter. What time the butter melts, slice your onion so you end up with bunches of little circles. Next, Slice and wash your potatoes. You're going to want to leave them pretty thin. Now, it's time to season your pork chops. I used Moroccan Seasoning from McCormick, but you can use whatever you like. Generously sprinkle seasoning on BOTH sides of meat. Lay the pork chops in the bottom of the crockpot. They'll probably overlap a bit, that's okay. Cover the meat with a layer of onions, then a layer of potatoes. Salt and pepper the layer of potatoes. Next, generously cover the potatoes with a layer of cheese. Repeat the process of layering onions, potatoes, salt & pepper and cheese until you're crockpot is full. Or you're out of ingredients.. :) Cook on high for around 4 -6 hours, or on low for roughly 8 hours. Your potatoes will be soft and your meat with pull apart easily. Sprinkle some extra cheese on each helping and serve. :)


                                                                    I hope you enjoy it!

Friday, August 31, 2012

Home Away From Home

It's official, I'm going crazy with out my little man! October seems so far away. However, he's having a blast hanging out in the country with Nana and Papa.
Last night he discovered the moon and stars are much brighter in the country than at home, while he took his bath in a wash tub outside.. LOL :) Only a shower at Nana's. Brad and I recorded a story on one of those recordable storybooks..he loves it! I highly recommend doing so if you're little one goes on a trip without you. I think I'm going to send him another one.
I have a feeling many crafts are to come soon...This Momma has way to much time on her hands! Speaking of, a new recipe is in the crockpot right now...

Wednesday, August 29, 2012

Fresh Herbs && Olive Oil Cubes

I know I know, I promised this post weeks ago, but after little miss made her grand arrival things have been a bit chaotic to say the least. In other news, Connor went to visit Nana and Papa until October. I know, OCTOBER! It's way harder than I thought it'd be, I can't wait until he comes home!! However, with the break, I'm finally catching up on blogging and such. Anywho, before we get to far off track..I want to share with you an awesome way to save all those extra fresh herbs. It happens to the best of us, we find an awesome recipe, it calls for a sprig or two of rosemary and you have to buy a small bundle and now your stuck with all this rosemary that eventually goes to waste. It's a waste of money and perfectly good herbs, but I found a way to save them, it's pretty simple too.

 Whatcha' need?

  • An ice cube tray 
  • Some extra herbs
  • A bottle of your favorite olive oil
Chop up some herbs, such as rosemary or oregano. Place a pinch or two in each cube of an empty ice cube tray. Top each cube off with some of your favorite olive oil, all the way to the top. Freeze for a day or two then transfer to a ziplock bag and store in the freezer.

Now you have perfect little cubes of flavored olive oil and herbs! Just plop one or two in a skillet and get cookin'!! :)


Welcome Olivia Grace!

At 5:34pm on July 27th, 2012, after 12 hours of labor, Olivia Grace made her way into this world.
Connor trying to get her to smell the flower he picked outside the hospital with daddy on the way to meet his baby sister for the first time. :)
Her very first bath.
A rainbow the day we took her home. :)

Mini Bathroom Revamp!

I found the cutest jungle print decor for Connor's bathroom today and I wanted to share!
He LOVES animals!
$30 and 10 minutes later! :)